How to evaluate your UX test yourself
Get the most out of your usability tests – step by step
Contents
Your test is complete - all videos are there. What happens now?
With moderated tests and interviews there are some special features, because here you can already start the evaluation live during the test. However, everything that happens after the test is completed can also be done in the evaluation tool as described here.
Why you should use the RapidUsertests evaluation tool for evaluation:
- Gain an overview: You can quickly get to the heart of your findings and get a transparent overview of the main issues with your product.
- Save time: You can quickly jump to the test's most important points, videos can be played at increased speed, and you can prioritize key findings quickly and easily.
- Convince others and share the results: You can share critical video points with colleagues, developers, or your boss in just a few clicks to inform and motivate them to make improvements.
In our evaluation tool, you will find all the tools you need for a thorough evaluation.
With a thorough evaluation, you save time afterwards and find as many UX problems as possible. Here, we guide you step by step through the evaluation process:
Preparation
1. Mindset:
Recall the questions and objectives of the test. This will put you in the right mindset for the evaluation.
2. Tagging system:
Think about categories for your evaluation that allow you to tag your findings in a meaningful way and use those tags later. This way you can easily filter and retrieve the results.
Expert tip: From our experience, the following category systems are most helpful:
- Location of the problem: e.g. product detail page, home page, product overview page, to easily locate the findings on your website or app.
- Use cases: When you're testing different use cases (e.g. specifically searching for a product, browsing, trying to contact the support).
- Departments: When you want to share insights with different stakeholders after evaluation (e.g. design, marketing).
3. Analyze the statistics:
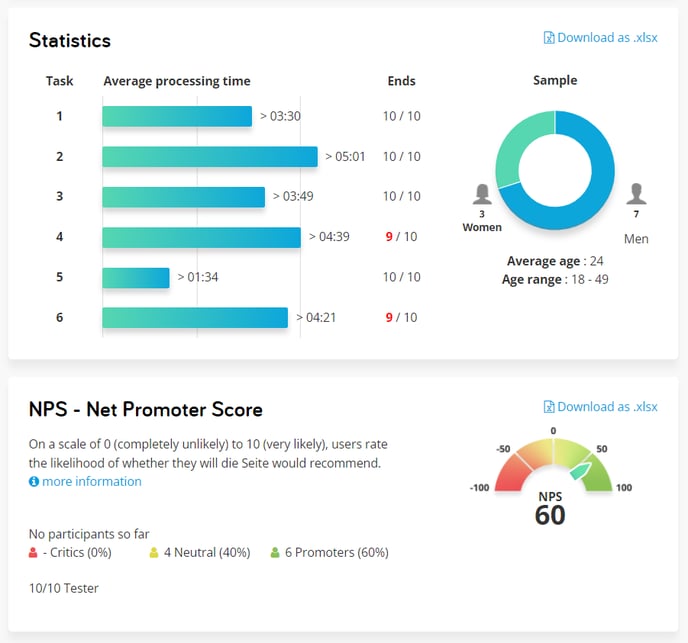
The statistics on the overview page will help you tune deeper in to the test results. For unmoderated tests with 7 or more testers, we also collect the NPS. We explain how to interpret it correctly here.

Analyze your videos
The best way to proceed with the evaluation is as follows: First, you document the results of the individual videos (in the case of moderated tests, you probably already started doing this during the test) and then evaluate your findings across all videos. Our tool supports you in this process.
Expert tip: Take notes faster with shortcuts:
- ENTER/SPACEBAR - Pause & enter your note
- ENTER - Save note & continue playing
- LEFT - 5s back
- RIGHT - 5s forward
- F - Full-screen
4. Adjust the playback speed:
Click 'Play' and increase the playback speed if necessary to save time. For most testers, 1.5 to 2 times the speed should not be a problem.
5. Document your findings:
You can record important insights as a comment below the video. A time marker is set in the video so that you can easily find the relevant point again. The comment is directly linked to the video.

Common mistakes:
- Taking too many or not enough notes: Focus on the following: Which problems do the users face? What unexpected behavior are they exhibiting? What expected behavior are they not exhibiting? Which goals are they not achieving and why? Which suggestions do they have for improvement?
- Only focusing on the users' opinions: Usability tests are about the problems in using the product, not about the testers' opinion. If a tester says "I don't like the blue of the banner, red would be nicer", this is their personal taste. Therefore, ask yourself: Does the color prevent the tester from using it? If the tester says "I don't see the gray buttons on the blue background at all", this question can be answered with a clear 'yes'.
- Getting overwhelmed by the amount of problems: Don't give up! Always keep your objective in mind.
Expert tip: Pay attention not only to what the testers say, but above all to what they do.
6. Use tags:
You can give your comments multiple tags. This way you can better filter and sort your findings later. Learn more about tags here.
7. Set priorities:
How urgently does this problem need to be fixed? You can give each comment a priority, which you can also filter by later.
Finish watching the video now and record, tag and prioritize all the findings in comments.
8. Rate the testers:
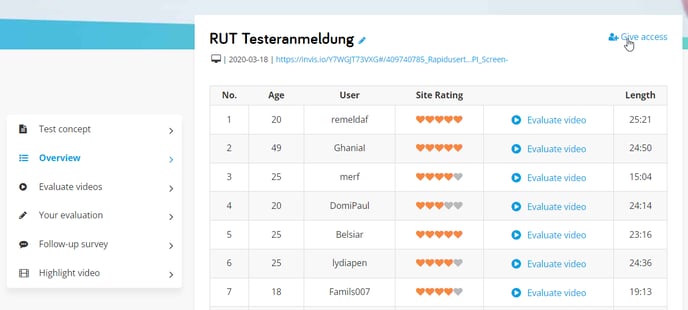
If you are not satisfied with a tester, report the problem to us, and we will replace them immediately. You can also rate the tester with one to five stars. Better rated testers will be invited more often by our algorithm. This way we guarantee a high quality of our tests.

"Your evaluation"
Expert tip: Before you start your detailed evaluation, it is helpful to briefly recall and write down the biggest UX problems you remember from the videos. And do this without looking at your notes again. This way, you can make an initial prioritization based on your gut feeling, because the problems that have stuck in your mind are certainly among the most serious.
Our tool now helps you to prioritize all problems across all videos and to derive the necessary optimizations.
To do this, go to "Your evaluation" in the side navigation. Here you will find all your findings from the videos collected in one place, but you can also jump back to the individual points in the video.
9. Filter the results:
You can filter the results by your tags and sort them by priority. This way you will not be overwhelmed by the amount of results, but can work through them one by one. You can also download the list as a csv.-file and use it internally.
10. Derive your tasks:
From the high-priority findings, you now derive tasks that you can pass on to the relevant departments or include in your roadmap. You can devote yourself to the other findings later.
Post-survey
11. Evaluate the post-survey:
Under the item "Post-survey" in the side navigation, you will find the questions that the testers answered in writing after the test. You can read the answers in our tool or download them as a csv.-file and process them in Excel.
Share the results
12. Share video clips:
On the video page, you will find a share icon at each comment. By clicking on it, you can send this comment's time stamp as a link. The recipient can then watch the video from this point onwards.

13. Cut a highlight video:
You can also cut a highlight video from the videos directly in our tool - here we explain how to do that.
14. Invite viewers to your tests:
You don't just want to share individual video clips, but instead an entire test? You can assign guests to your tests in the test overview. This way, your colleagues can watch all videos and comments, and also write comments themselves.

Expert tip: Time stamps and highlight videos are wonderful for convincing stakeholders. A clueless tester says more than a thousand words 😉 And you avoid cutting together the videos yourself or creating presentations.
And now: Good luck with the optimization!
Here you can download our wireframing kit, with which you can implement your findings from the tests as wireframes in no time: Download our wireframing kit
